내 안드로이드 앱에서 다른 앱을 실행시키는 방법을 android tutorial 페이지에서 보고 정리해 놓는다.
http://developer.android.com/training/basics/intents/sending.html
Implicit Intent 사용하기 (불분명한 Intent)
Implicit Intent는 실행할 Class이름 등으로 선언하지 않는다. 대신 실행할 Action을 선언한다.
Action은 당신이 해야한 것(do)를 기술한다. 예를 들면 보고 싶은 주소(address)에 대한 뷰(view), 보내고 싶은(send) 이메일 메세지 등과 같다.
보내고 싶은 Intent에 따라서 Data는 Uri(android.net.Uri)일 수도 있고 다른 데이터 타입일 수도 있으며 필요가 없을 수도 있다.
만약 Data가 Uri라면 아래의 예를 통해 쉽게 이해할 수 있다.
아래는 전화번호를 기술한 Uri를 사용해서 전화를 거는 intent를 실행하는 예이다.
Uri number = Uri.parse("tel:5551234");
Intent callIntent = new Intent(Intent.ACTION_DIAL, number);앱에서 startActivity()를 호출해서 위의 intent를 실행하면, 전화 App은 주어진 전화번호로 전화를 건다.
아래는 Map을 보는(view) 예이다.
// Map point based on address
Uri location = Uri.parse("geo:0,0?q=1600+Amphitheatre+Parkway,+Mountain+View,+California");
// Or map point based on latitude/longitude
// Uri location = Uri.parse("geo:37.422219,-122.08364?z=14"); // z param is zoom level
Intent mapIntent = new Intent(Intent.ACTION_VIEW, location);
아래는 Web page를 보는 예이다.
Uri webpage = Uri.parse("http://www.android.com");
Intent webIntent = new Intent(Intent.ACTION_VIEW, webpage);
어떤 implicit intent는 extra 데이터를 필요로 한다. 필요에 따라 putExtra() method로 extra data들을 추가할 수 있다.
아래는 extra 데이터들을 추가해 이메일을 보내는 예이다.
Intent emailIntent = new Intent(Intent.ACTION_SEND);
// The intent does not have a URI, so declare the "text/plain" MIME type
emailIntent.setType(HTTP.PLAIN_TEXT_TYPE);
emailIntent.putExtra(Intent.EXTRA_EMAIL, new String[] {"jon@example.com"}); // recipients
emailIntent.putExtra(Intent.EXTRA_SUBJECT, "Email subject");
emailIntent.putExtra(Intent.EXTRA_TEXT, "Email message text");
emailIntent.putExtra(Intent.EXTRA_STREAM, Uri.parse("content://path/to/email/attachment"));
// You can also attach multiple items by passing an ArrayList of Uris
위에서 setType을 통해서 Mime type이 Plain text라는 것을 명시했는데 이전의 예와 다르게 Uri객체를 포함하지 않은 plain text만 전달되기 때문이다.
이 부분은 중요할 수 있는데 가능한한 자세하게 알려주는 것이 좋다.
예를 들어 image를 view Action으로 전달하는 경우 mime type을 image/*로 표현하지 않는다면 이미지를 해석하지 못하는 map과 같은 application이 목록에 뜨거나할 수 있기 때문이다.
Intent를 받을 수있는 App이 있는지 검증하기
안드로이드에서 Phone, email,calendar App과 같이 보통 Intent를 받을 수 있는 built-in app들을 지원하지만 혹시 모르는 일이니 원하는 Intent를 받을 수 있는 app이 존재하는지 check하는 것이 좋다.
아래는 호출할 intent에 대해서 받아줄 수 있는 App들이 있는지 확인하는 code snippet이다.
PackageManager packageManager =getPackageManager();
List<ResolveInfo> activities = packageManager.queryIntentActivities(intent, 0);
boolean isIntentSafe = activities.size() > 0;
isIntentSafe가 false이 경우는 해당 Intent를 받아줄 수 있는 app이 없다는 뜻이므로 이에대한 적절한 처리를 하면 좋겠다.
Intent 시작하기
startActvity() 메서드를 호출해 아래와 같이 intent를 호출 할 수 있다.
startActivity(intent);
그럼 그림 1과 같이 intent를 실행할 수 있는 app들이 나타난다.

그림 1. intent를 지원하는 App목록을 나타낸 Selection dialog
아래는 지도를 호출하는 좀더 자세한 예이다.
// Build the intent
Uri location = Uri.parse("geo:0,0?q=1600+Amphitheatre+Parkway,+Mountain+View,+California");
Intent mapIntent = new Intent(Intent.ACTION_VIEW, location);
// Verify it resolves
PackageManager packageManager =getPackageManager();
List<ResolveInfo> activities = packageManager.queryIntentActivities(mapIntent, 0);
boolean isIntentSafe = activities.size() > 0;
// Start an activity if it's safe
if (isIntentSafe) {
startActivity(mapIntent);
}
App Chooser를 보여주기
공유하기 등과 같이 항상 여러가지 선택을 주었으면 하는 상황에서는 Default action을 지정할 수 없도록 Chooser를 제공할 수 있다.
이렇게 하는 경우 Intent를 실행하면 항상 chooser가 나타나 app을 선택하도록 해준다.
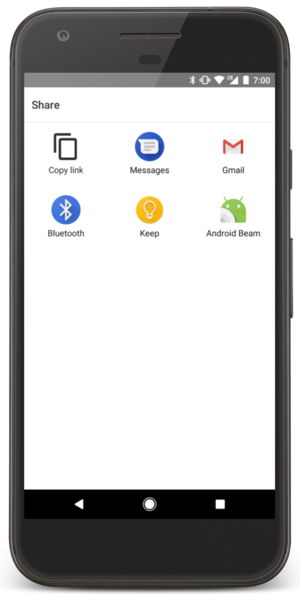
그림 2. App chooser를 제공해서 원하는 앱을 고르도록 하는 화면
chooser를 사용하는 code snippet이다.
Intent intent = new Intent(Intent.ACTION_SEND);
...

// Always use string resources for UI text. This says something like "Share this photo with"
String title = getResources().getText(R.string.chooser_title);
// Create and start the chooser
Intent chooser = Intent.createChooser(intent, title);
startActivity(chooser);